


Step-by-Step Guide to Custom Signs Design and Installation
- May 03rd, 2024
If you’re thinking about getting a custom sign for your business, starting in the right place is key. Our comprehensive guide on custom signs design and installation covers everything you need to know. From choosing the right materials to designing a sign that fits your brand, we lay out all the steps clearly.
By following our guide, you’ll learn how to create a professional-looking sign that effectively communicates your brand’s message. This will not only attract attention but also leave a lasting impression on your customers, boosting your business’s presence in the market. Let’s dive in.
Process for Designing and Installing Commercial Signage
Planning to change-up your signage for your business? Let’s take a look at the process for designing and installing signage.
Step #1: Client Consultation and Needs Assessment
This initial meeting is critical as it sets the foundation for the entire project. The goal is to understand the client’s business, brand aesthetics, and the message clients want to convey through the signage. The discussions often cover the target audience, location specifics, desired impact, and any thematic elements the client wants to incorporate.
Budget constraints, sign material preferences, timeline expectations, and any previous issues with signage are also typically addressed. This stage ensures that the signage company fully understands the client’s vision and requirements as well as business signage needs.
Step #2: Site Survey
A site survey is conducted to gather all necessary physical and environmental details of the installation site. This includes measuring dimensions, checking for structural support–especially for large or heavy signage like pylon signage–understanding local weather conditions that could impact material choices for outdoor signs and identifying visibility obstacles.
Additionally, this step involves evaluating accessibility for installation equipment and assessing electrical connections if the signage is illuminated. The site survey helps prevent future complications by ensuring all variables are considered in the sign design process.

Step #3: Design Conceptualisation
With the information gathered from the initial consultation and site survey, the design team starts conceptualising the signage. This involves creating mockups or sketches incorporating the client’s branding elements, such as logos, colour schemes, and typography.
The team of sign writers also consider the readability of the signage from various angles and distances, its visibility at different times of the day, and how it looks against its environment. The conceptualisation phase may use software tools to simulate how the 3D signs look in real-world conditions.
Step #4: Client Review and Feedback
The initial designs are then presented to the client for review. This presentation can be in the form of digital renderings, physical models, or interactive simulations. The client’s feedback is crucial at this stage as it directs the necessary revisions to align the signage with their preferences and expectations.
It’s common to go through several rounds of feedback and revision to refine the design. Effective communication between the client and the designers is key so the final design accurately represents the brand and meets the client’s needs.
Do you need expert help with your factory, site, shop, or business signage? Let us do the heavy lifting for you. Connect with us today for signages that are perfect to the last detail.
Step #5: Final Design and Engineering
Once the client approves the design, detailed engineering drawings and specifications are developed. This documentation includes precise dimensions, structural support details, material specifications, electrical schematics for illuminated signs, and technical details required for fabrication and installation.
This step may involve collaboration with structural engineers or other specialists to ensure the signage is safe, durable, and compliant with all local building codes and regulations. The final design documents serve as a blueprint for the fabrication team and are crucial for obtaining necessary permits from local authorities.
Step #6: Permitting
Securing the necessary permits is crucial so that signage complies with local zoning laws, building codes, and any specific signage regulations.
This process may involve detailed applications, the submission of design specifications, and sometimes community consultations. Failure to obtain the proper permits can lead to fines, forced removal of the signage, or delays in the project timeline.
Struggling with signage permits? Let Swift Signs handle it. Get in touch with us for hassle-free permit assistance.
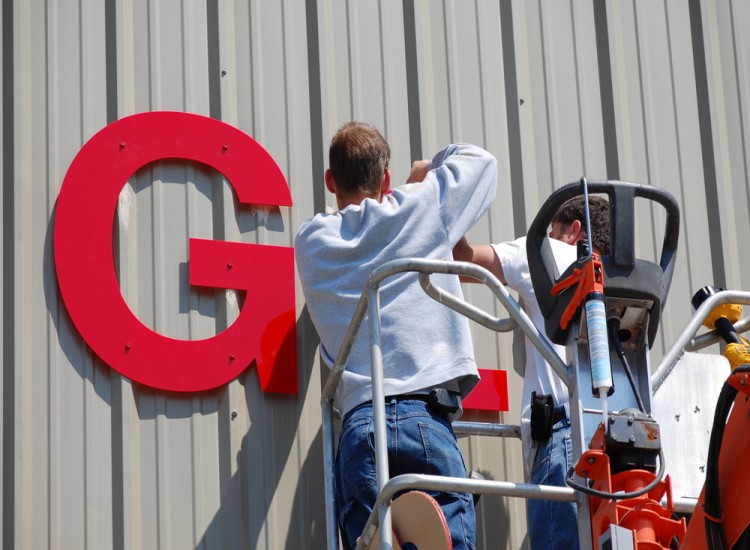
Step #7: Installation
The installation phase must be carefully planned and executed so the signage is safely and securely installed. This includes preparing the site, making sure mounting structures are strong and that electrical connections (for illuminated signs) are safely made.
The sign installation project team must handle the high-quality materials carefully to avoid damage and ensure the sign is perfectly aligned and level. Depending on the size and location of the signage, this step might require specialised equipment. Cranes, cherry pickers, and traffic management plans support sign installation in busy areas.

Step #8: Quality Check and Handover
Conducting a thorough quality check is essential before handing over the sign to the client. This inspection ensures that the signage meets the quality standards set out in the design phase and that there are no defects, such as misalignments, improper fittings, or incorrect lighting.
It’s also important to check that the sign is clean and presented well. After the quality check, a formal handover to the client involves demonstrating the functionality of the sign, providing all necessary documentation, and explaining any maintenance or operational procedures.
The process of designing and installing commercial signage can be complex. If you need help creating signs that look great and last long, Swift Signs specialises in every step of custom signage. Contact us today to get expert help with your signage project.
Custom Design Tips To Follow
When designing custom signage, it’s important to focus on clarity, visibility, and aesthetic appeal to effectively communicate your message.
The following tips provide practical guidance on creating signs that are not only visually engaging but also functionally effective for any setting:
1: Understand the Purpose
Every sign should have a clear objective. This could be to attract customers, direct traffic, promote a sale or enhance brand recognition. Before starting the design process, identify what you want the sign to achieve.
This clarity helps tailor the design elements, such as the message, colours, and size, to suit the specific purpose. For example, directional safety signage in a large complex might focus on clarity and simplicity to guide people. In contrast, promotional signage might be more vibrant and dynamic to capture attention.
2: Keep It Legible
Legibility is critical for effective signage. This is influenced by the choice of font, the size of the text, and the spacing between letters and lines. For optimal legibility, select fonts that are easily read from various distances and angles.
Serif fonts can be used for more traditional businesses or for smaller text that will be viewed up close, while sans-serif fonts are generally better for modern looks and larger signs viewed from a distance. Ensure the main message is in a larger font to draw attention.
3: Use High Contrast
Contrast strongly affects the visibility and readability of signs. High contrast between the text (or graphics) and the background ensures that the elements of the sign stand out.
For example, dark text on a light background or vice versa will be more visible than colour combinations with less contrast, such as light blue on dark blue. This principle is particularly important in locations where signs may be viewed from afar or in passing, like on highways or busy streets.
4: Limit Colour Palette
A limited colour palette not only helps maintain the visual coherence of the signage but also reinforces brand identity. When choosing colours, consider those that align with the brand’s existing palette to ensure consistency across all marketing materials.
Typically, two to three colours would suffice – one for the background, one for the primary text, and perhaps another for secondary information or accents. Overusing colours can make a sign look chaotic and dilute the main message.
5: Incorporate Space
The strategic use of space, or ‘white space’, is essential in sign design. White space refers to the parts of the sign that are left blank intentionally. It helps reduce visual clutter and focus the viewer’s attention on the most important elements. It also enhances the overall aesthetic quality of the sign, making it appear more professional and deliberate.
Adequate spacing around text and graphics helps prevent the elements from blending into each other, especially from a distance, ensuring the sign is easier to read and more impactful.
6: Visual Hierarchy
Visual hierarchy is the arrangement of elements in a way that implies importance, guiding the viewer’s eye through the content in a planned sequence. This can be achieved by using different sizes for different elements (larger text for primary messages and smaller text for secondary details), using bold colours for important words, or placing key messages at the top or centre of the design.
For instance, in a promotional sign, the main offer or call to action should be the most prominent part so it catches the viewer’s attention first.
Choose Swift Signs – A Digital Signage in Melbourne
If your business signage needs a refresh or you’re setting up new signs, look no further than Swift Signs. With over 50 years of expertise in crafting and maintaining high-quality signs, we’ve mastered the art of delivering signage that stands out and endures. Whether you need parking signs, shop signs, neon signs, digital signage, vehicle signage, reception signs or corporate signage in Melbourne, our team provides exceptional service and unparalleled expertise.
Choose Swift Signs for your signage needs in Melbourne and beyond. We’re committed to excellence and ready to help you make a lasting impression. Contact us today to see how we can bring your vision to life with stunning, effective signage solutions at competitive prices and minimal downtime.